Buttermilk Pie Crust
Don’t be intimidated by homemade pie crust! Use this simple recipe and method to make the most delicious, flaky pie crust you’ve ever had. Calling for just 7 ingredients, Buttermilk Pie Crust is a tender, slightly sweet crust that pairs beautifully with any dessert pie.
Servings 8
Calories 205kcal
Ingredients
- 1 ½ cups all-purpose flour 195g
- 1 tablespoon granulated sugar 16g
- 1 ½ teaspoons cornstarch 6g
- ¾ teaspoon kosher salt 5g
- ½ cup unsalted butter very cold, cut into 1” pats
- 1/3 cup buttermilk 80 ml (whole fat buttermilk is recommended)
- 1-2 tablespoons vodka
Instructions
Make the Pie Crust
- Combine 1 cup of the flour with the sugar, cornstarch and salt in a large food processor. Pulse a few times to combine.
- Add the cut butter to the mixture, pulsing the food processor until the butter is broken down into smaller pieces.
- Add the rest of the flour, and process for 10 seconds.
- Pour the mixture into a bowl, and pour in the buttermilk and vodka slowly, working clockwise to work the ingredients into the crust. The crust should just hold together when it’s ready. All you need to do is squeeze it with your hand to confirm.
- Press into two loose rounds. Transfer each to a separate piece of plastic wrap. (This way, you have a separate bottom crust, as well as a top crust. And if your pie doesn’t have a top crust, you can freeze the second round for later.)
- Wrap tightly, then refrigerate for 2-3 hours or overnight. This can also be done where you freeze the dough if you want to make it well in advance.
Shape the Pie Crust
- Preheat the oven to 400°F. Choose a 9" pie plate and set aside.
- Sprinkle a clean, flat surface with a layer of flour. (Place a few spoonfuls of flour into a small bowl next to your workspace in case you need more.)
- Roll out the crust. Flatten the dough ball with your rolling pin, then roll outwards, turning the crust occasionally to keep a round(ish) shape.
- When the crust is ¼” to ½” thick, fold in half, then on top of itself to where it looks like a triangle and place the end of the point in the middle of a pie plate.
- Unfold the pie crust, and spread it out evenly on the pie plate.
- Trim the edges to where there is about 1” of crust hanging off the pie plate.
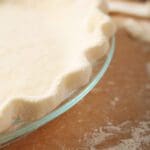
- Lightly flour your fingers, and use your hands to gently crimp the crust. (I use the pointer finger and thumb of my left hand to form a V shape on the inside of the crust and use my right thumb to press the dough on the outside of the crust into my left hand to create the crimps.) You may also fold the crust in on itself, and press the sides down with a fork if you don’t want to crimp the crust.
- Blind Bake the Pie Crust
- Once the crust has been crimped, poke the bottom of the crust a few times with a fork, place a sheet of foil or parchment down on top of it and cover with pie weights or dried beans.
- Bake in the preheated oven for 12-15 minutes or until the edges of the pie crust are golden brown.
- Remove the pie crust from the oven and gently lift the pie weights out of the crust using the parchment.
- Set the pie crust aside to cool slightly before adding your filling and baking again, according to the pie recipe instructions.
Notes
How to store: Store wrapped tightly in plastic wrap in the refrigerator for 1-2 weeks or in the freezer for 3 months. You may also roll out the pie crusts and place them in pie pans and freeze them in the pans to where you just need to bake them off. (I recommend doing this in a disposable aluminum tin instead of a fancier ceramic pie plate.)
Nutrition
Serving: 1g | Calories: 205kcal | Carbohydrates: 20g | Protein: 3g | Fat: 12g | Saturated Fat: 8g | Polyunsaturated Fat: 1g | Monounsaturated Fat: 3g | Trans Fat: 0.5g | Cholesterol: 32mg | Sodium: 231mg | Potassium: 42mg | Fiber: 1g | Sugar: 2g | Vitamin A: 371IU | Calcium: 19mg | Iron: 1mg
